Azure PowerShell ARM Profile

If you’re using Azure Resource Manager (ARM) cmdlets and debugging scripts in the ISE, it can be painful to keep executing Login-AzureRmAccount to establish a connection to the subscription on which you want to execute your code against.  As you know this requires one to enter and re-enter the username/password each time.

Instead you can do the following:

  1. Start a new PowerShell session in the ISE or Command Prompt.
  2. Execute Login-AzureRmAccount one last time for a given subscription and identity.  Enter the username/password as required.
  3. Execute Save-AzureRmProfile -Path C:\PSScripts\<username>_<subscriptionname>_Profile.apf where username is the account you need to use to execute your scripts and the subscriptionname is the name of the subscription to connect to.  This just helps keep these files organized if you are dealing with more than one account/subscription.  You may even want to include a date/time stamp in the filename since in most cases the username’s password will be subject to password expiration policy unless you’ve turned that off.

From that point forward all you need to do to enable PowerShell to login to that same Azure Subscription using the same username/password originally specified is:

Select-AzureRmProfile -Path C:\PSScripts\<username>_<subscriptionname>_Profile.apf

Just place it at the top of the script and don’t forget to remove it before putting it in Source Control. This is not the safest thing in the world, but certainly convenient for testing on your local machine as you debug your way through your code.

Posted in PowerShell

Microsoft Azure, Cloud and Enterprise Symbol / Icon Set – Visio stencil, PowerPoint, PNG

Microsoft has released an update (10/22/2015) to their Visio stencils and images for use in drawing architectural and system diagrams using the Microsoft platform technologies.  In order to improve and streamline our communications, understanding of our proposals, document / create the necessary IP around our solutions we should all have these installed :  http://www.microsoft.com/en-us/download/details.aspx?id=41937

Using these symbols to describe systems built with Azure and other Microsoft products helps establish a consistent visual language. This speeds the understanding of system scenarios and architectures and anchors discussions among your employees, customers, and other 3rd parties.

My intuition tells me that this is only the first step toward making Visio the standard for drawing then deploying Azure Resource Manager Templates based upon a JSON payload.  Time will tell…

Tagged with: , ,
Posted in Office

Selecting / Managing Multiple Azure Subscriptions w/PowerShell

Everything changes and nothing stands still. – Heraclitus

Azure is no different than any other technology in this respect, thus patterns and practices used just one or two years ago are now obsolete.  Since the launch of Azure customers have been using multiple subscriptions to bring a level of authorization, customer/business unit, application and/or service isolation.  Clearly this approach was flawed from a scale and manageability perspective and I’m willing to bet this began causing issues for Microsoft Azure Support and Operations as well.

As Azure has matured Microsoft introduced the Azure Resource Manager to provide much improved authorization (Azure AD), customer/business unit, application, and/or service isolation without incurring the overhead of additional and disparate subscriptions.

That said, I like to call the old ways of working with Azure – Azure Classic Mode and the new methodologies just Azure.  Microsoft seems to agree in that many of the items listed in the new Azure Management Portal are in fact labeled – Classic.  Additionally there are many times when automation (DevOps) of Azure requires the selection of the correct subscription to execute against.

In this post, I’m providing a few simple PowerShell functions that can be used together to select the correct Azure Subscription before any additional automation code is called or executed.  These functions rely upon a parameter of the subscription name being provided:  $Subscription

[CmdletBinding()]

Param(

    [Parameter(Mandatory=$True, Position=0, HelpMessage=“The name of the Azure Subscription for which you’ve imported a *.publishingsettings file.”)]

    [string]$Subscription


)

First we always need to  determine from what mode PowerShell  has been invoked.  From the ISE or Command line?

#region CheckPowerShell()


Function CheckPowerShell()


{

    # Check if we’re running in the PowerShell ISE or PowerShell Console.

    If ($Host.Name -like “*ISE*”)

    {

        $ISE = $True

        # Console output

        Write-Verbose -Message “[Information] Running in PowerShell ISE.” -Verbose


    }

    Else # Executing from the PowerShell Console instead of the PowerShell ISE.

    {

        $ISE = $False

        # Console output

        Write-Verbose -Message “[Information] Running in PowerShell Console.” -Verbose


    }


    Return $ISE


} # End CheckPowerShell()


#endregion CheckPowerShell()


Next we’ll need to determine the PowerShell script name executing.

#region Get-PSScriptName()


Function Get-PSScriptName()

{


Param ([bool]$ISE)


    If ($ISE)


    {

        $PSScriptName = (Split-Path -Leaf $psISE.CurrentFile.DisplayName)

    }

    Else

    {

        $PSScriptName = $PSCommandPath | Split-Path -Leaf

    }


    Return $PSScriptName


} # End Function


#endregion Get-PSScriptName()


Finally we can determine whether the Azure subscription name provided as a parameter for our PowerShell script exists, if not, provide some helpful hints to resolve the issue.

#region Select-Subscription()


Function Select-Subscription()


{


Param ([string]$Subscription)


    Try

    {

        $Error.Clear()


        #Select Azure Subscription

        Select-AzureSubscription -SubscriptionName $Subscription -ErrorAction Stop -Verbose


        # Console output

        Write-Verbose -Message “[Information] Currently selected Azure subscription is: $Subscription.” -Verbose

        Write-Verbose -Message ” “ -Verbose

    }

    Catch

    {

        # Console output

        Write-Verbose -Message $Error[0].Exception.Message -Verbose

        Write-Verbose -Message ” “ -Verbose

        Write-Verbose -Message “[$PSScriptName]  FATAL EXCEPTION:” -Verbose

        Write-Verbose -Message “[$PSScriptName]  Please check subscriiption name and/or make sure *.publishingsettings file has been imported.” -Verbose

        Write-Verbose -Message ” “ -Verbose

        Write-Verbose -Message “[$PSScriptName]  http://azure.microsoft.com/en-us/documentation/articles/install-configure-powershell/#Connect&#8221; -Verbose

        Write-Verbose -Message ” “ -Verbose

        Write-Verbose -Message “[$PSScriptName]  Exiting due to exception: Subscription Not Found.” -Verbose


        $Error.Clear()

    } # End Try/Catch


} # End Function Select-Subscription()


#endregion Select-Subscription()


You can test this by calling the functions in sequence as shown below:

# Call Function

$ISE = CheckPowerShell

$PSScriptName = Get-PSScriptName $ISE

Select-Subscription $Subscription


Keep in mind that as time goes on we should be creating fewer and fewer distinct Azure Subscriptions and instead adopting Resource Groups through Azure Resource Manager.  To provide the required isolation our adoption of Tagging and Role Based Access Control with Azure AD among various Azure resources will provide increased security and manageability overall.

Tagged with:
Posted in Azure IaaS

Azure Networking – Connecting Multiple Azure Regions via Site-To-Site VPN


Background Summary

There are many blog posts out there that attempt to cover this topic in detail.  Microsoft has provided rudimentary documentation on this subject since early 2015.  Unfortunately none of the resources (Blogs/Microsoft) cover this topic in enough detail to help you actually accomplish this task.

The scenario is that you’ve got an application in PaaS or IaaS deployed in distinct separate Azure Regions (Locations) and want to provide network connectivity between those Regions.  Remember, Region= Location. The region / location terminology continues to be confusing between the technical and marketing documentation.

Before consuming this post the following Azure MSDN article MUST be understood.  Even better, it should have been accomplished by the reader as we are going to build upon the basic principles contained within.

Configure a VNet to VNet Connection (April 14,2015):  https://msdn.microsoft.com/en-us/library/azure/dn690122.aspx

To be honest, if the above tasks hasn’t been completed successfully – in a Sandbox Azure Subscription – don’t proceed any further until you have or this will lead to nothing but frustration.

Scenario

Let’s paint a clear scenario before we get started.  We have 3 Azure Virtual Networks (VNETs) as follows:

  • VNET1 10.1.0.0/16 (East-US)
    • Subnet-1 10.1.0.0/19 or whatever you want.
    • 10.1.32.0/29 <– Don’t forget to add a Gateway Subnet!
  • VNET2 10.2.0.0/16 (Central-US)  <—This will become our HUB Network (aka Dual S2S VNet)
    • Subnet-1 10.2.0.0/19 or whatever you want.
    • 10.2.32.0/29 <– Don’t forget to add a Gateway Subnet!
  • VNET3 10.3.0.0/16 (West-US)
    • Subnet-1 10.3.0.0/19 or whatever you want.
    • 10.3.32.0/29  <– Don’t forget to add a Gateway Subnet!

I’ve chosen VNet2 in Central-US as the HUB network simply to help you visualize this.  Central-US will need to connect to both East-US and West-US, while there will be no connectivity between East-US and West-US directly.

Step 1

After you have created this three (3) VNets using either the Azure Management Console or PowerShell, the following steps must be taken – in order – to achieve our goal.

  1. Create VNET1-Local 1.0.0.1 10.1.0.0/16 as a Local Network
  2. Create VNET2-Local 1.0.0.1 10.2.0.0/16 as a Local Network
  3. Create VNET3-Local 1.0.0.1 10.3.0.0/16 as a Local Network

When creating these Local Networks in the Azure Management Console, simply specify a dummy address like 1.0.0.1 for the Gateway initially.  We will come back and edit/update these dummy Gateway addresses with the real IP addresses once Azure finishes provisioning them.

Configure VNET1 –> VNET2-Local w/Gateway Subnet (1.0.0.1), AND VNET2 –> VNET1-Local w/Gateway Subnet (1.0.0.1).  (Reciprocals of each other.)  Remember?  VNET1 or East-US points to VNET2 or Central-US and visa versa if you want packets to flow back and forth between the two networks!  This is no different that what you did following  Configure a VNet to VNet Connection (April 14,2015):  https://msdn.microsoft.com/en-us/library/azure/dn690122.aspx earlier.

Create, in the Azure Management Console, the Dynamic Gateway’s for both of them.  These cannot be Static!  Once these are created, it can take 30 minutes for these to complete, you’ll want to update the VNET1-Local/East-US Gateway IP address for VNET1, VNET2-Local/East-US Gateway IP address for VNET2 replacing the dummy values we used earlier of 1.0.0.1.

As before following  Configure a VNet to VNet Connection (April 14,2015):  https://msdn.microsoft.com/en-us/library/azure/dn690122.aspx earlier.  Do not bother to connect the IPSEC keys just yet.  Take a breath and pat yourself on the back!

Step 2

Now we’re going to expand this to include VNET3/West-US ALSO connecting to VNET2/Central-US making VNET2/Central-US the HUB Network.

Configure VNET3 –> VNET2-Local w/Gateway Subnet.  Honestly, it really doesn’t matter here as long as you don’t try to point to itself you could also do VNET3 –> VNET1-Local.  Whichever you point at, this is the one where DUAL (HUB) VNETs must be configured in the NetworkConfig.xml file to reciprocate with the other.

Create the Dynamic Gateway’s for VNET3 just like you did for VNET1 and VNET2.  Again, wait for 30 minutes for this to get created.  Once created, don’t forget to update VNET3-Local with VNET3’s Gateway IP returned from the Dynamic Gateway creation process.

image image image

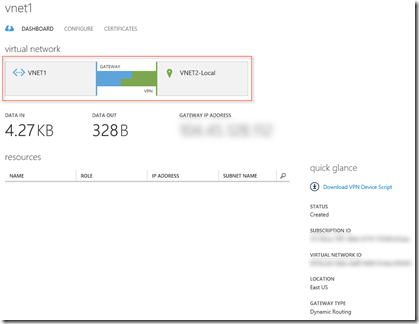
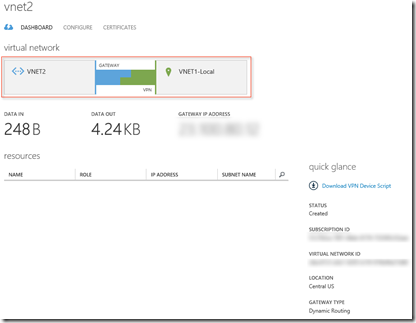
At this point you should have something like this.

Step 3

Run two PowerShell cmdlets, one for each VNET1 and VNET2 to establish bi-directional IPSEC keys replace “SharedKeyOfChoice” with a key of your choosing:

Set-AzureVNetGatewayKey -VNetName “VNET1” -LocalNetworkSiteName “VNET2-Local” -SharedKey “SharedKeyOfChoice”


Set-AzureVNetGatewayKey -VNetName “VNET2” -LocalNetworkSiteName “VNET1-Local” -SharedKey “SharedKeyOfChoice”


image image


Step 4

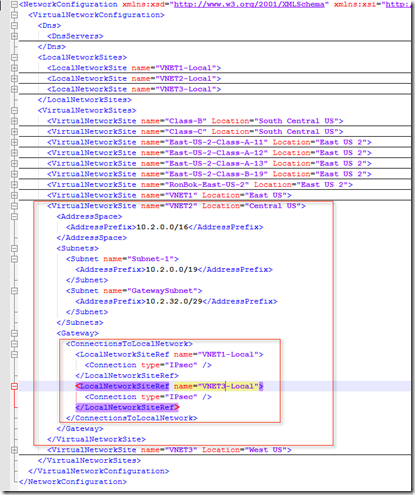
This is the more challenging part.  Export the NetworkConfig.xml file and update VNET2 to include the Local Network for VNET3-Local.  Then re-import the file after saving it.

I like using Notepad++ for this since it provides some nice features for editing XML.

We want to go from this:

From this… –>
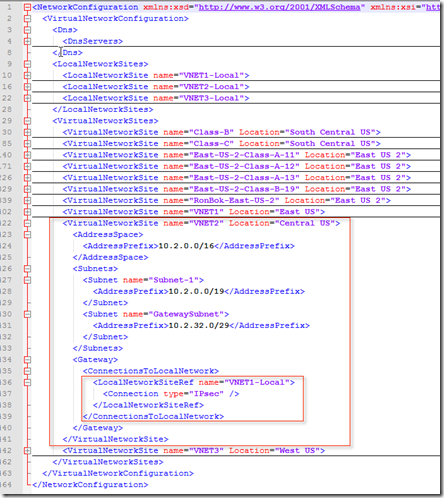
image
–> …to this!
image

Now re-import the NetworkConfig.xml file to update the network with this change.

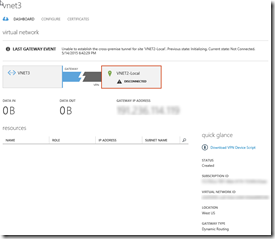
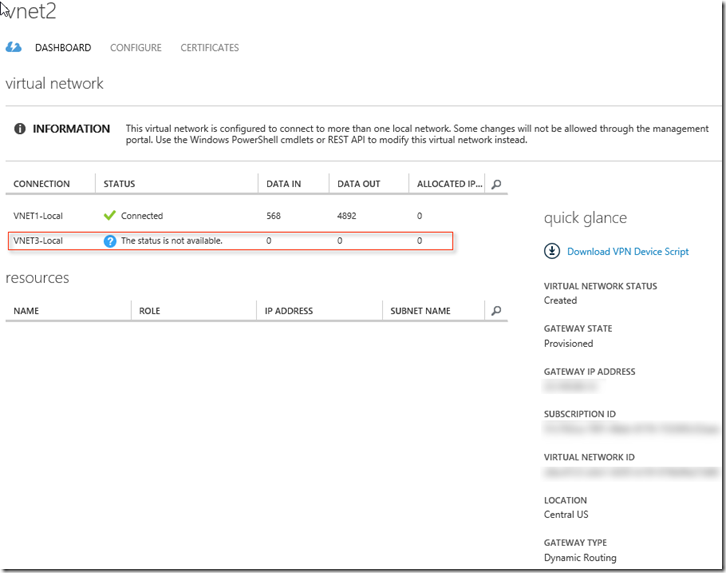
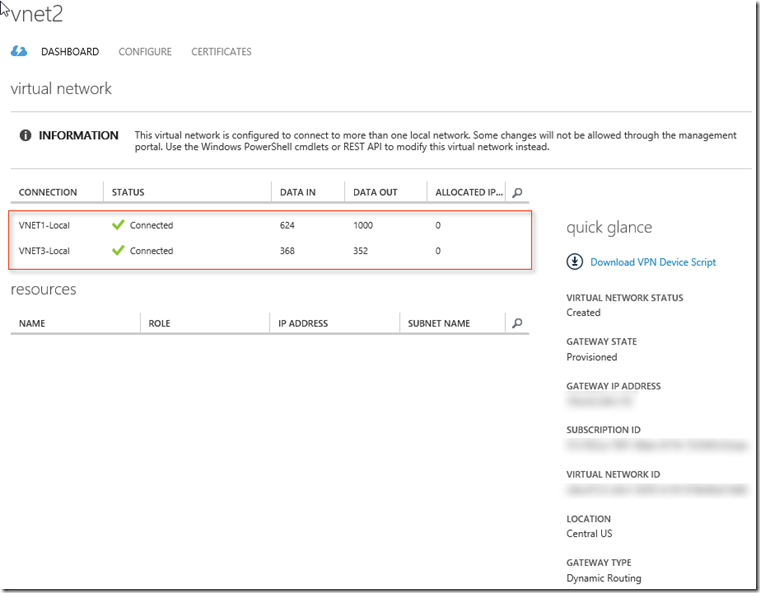
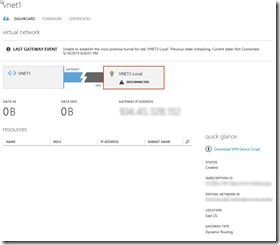
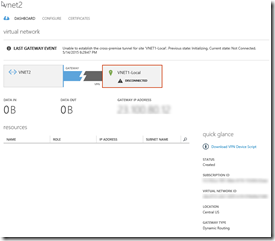
Every single Blog post out there then shows both VNETs with one connected and the other disconnected.  This has NOT been my experience.  Instead, you end up with the following where VNET1-Local will show connected and the newly added connection to the HUB will show “The status is not available.”  This status will prevent you from establishing a connection by applying a shared IPSEC key like before.

image

If you get this  then you MUST delete the Gateway previously established on VNET2 and re-establish it!  Another 30 minute wait…

Why?  Well, if you try and establish the connection by updating the IPSEC keys the PowerShell cmdlet will fail – for 100% sure because VNET3-Local does NOT exist.  Basically Azure didn’t update the network.

image


Once you delete the VNET2 Gateway, make sure you update VNET2-Local with the new Gateway IP address.

Then the above PowerShell commands WILL WORK because you should see that VNET3-Local will now show as ‘Disconnected’ rather than “The status is not available.”.
 

image


Step 5

The proof now is to place, temporally, 3 VMs one in each network  and enabling ICMP IPv4 for the firewalls you should be able to ping between VNET1 and VNET2 as well as VNET2 and VNET3, but not between the machines in VNET1 and VNET3 directly.

if you have any questions about this article or need assistance please feel free to comment below.
Tagged with: ,
Posted in Azure IaaS

Getting Started w/Azure & PowerShell

Getting Started Azure PowerShell-BostonAzureGroup

On Monday, March 23rd I presented this session for the Boston Azure User Group at the Microsoft New England Research & Development Center in Cambridge.

For those who attended, Thank You!  As promised the link above is a copy of the PowerPoint presentation used.  Feel free to ask follow up questions as needed.

Posted in Uncategorized

Manage Windows Azure IaaS w/PowerShell

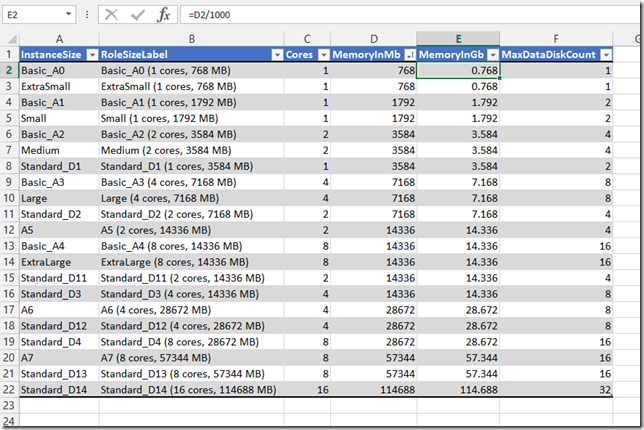
Quite often when creating new Virtual Machines in Azure IaaS we find ourselves looking up the available Azure VM Role Sizes on a Region by Region basis.  What I’d like to have handy is a quick Excel spreadsheet that I could sort, filter or group by various Role Size attributes and then plug in the proper -InstanceSize value for the New-AzureVMConfig command.

New-AzureVMConfig -Name $VMName -InstanceSize “Medium” -ImageName $AzureVMImage

In the example above, the choice for Role Size or -InstanceSize is “Medium”, but quick, answer the question about the other choices above that?  I think you get the point.

So enough already, here’s the code sample, but of course you could turn this into a full function as well, but this should get you started.  Notice too that we’re forcing the execution of this in the PowerShell ISE.


# Check if we’re running in the PowerShell ISE or PowerShell Console.

If ($Host.Name -like “*ISE*”)

{

    $AzureLocation = “Central US”

    $AzureVMRoleSize = (Get-AzureLocation | Where { $_.DisplayName –eq $AzureLocation}).VirtualMachineRoleSizes

    $CSVFileName = (Split-Path -Parent $psISE.CurrentFile.FullPath) + “\” + “AzureVMRoleSizes.csv”


    # If an old version of the CSV file exists, we’ll delete it.

    If(Test-Path $CSVFileName)

        {

            Remove-Item $CSVFileName -Verbose

        }


    # Console output

    Write-Verbose -Message “…” -Verbose

    Write-Verbose -Message “[Start] Creating the CSV file: $CSVFileName.” -Verbose


    Foreach ($VMSize in $AzureVMRoleSize)

    {


        # Create the CSV file.

        Get-AzureRoleSize $VMSize | Select InstanceSize,RoleSizeLabel,Cores,MemoryInMB,MaxDataDiskCount | Export-Csv $CSVFileName -NoTypeInformation -Append -Verbose


    }


    # Console output

    Write-Verbose -Message “…” -Verbose

    Write-Verbose -Message “[Finish] Created CSV file: $CSVFileName. To view, double-click to open in Excel.” -Verbose

 }

 Else

{

    # Console output

    Write-Verbose -Message “[Stop] Unable to continue. PowerShell ISE, not the PowerShell Console, must be used for execution.” -Verbose

    Stop

}


Copy/Paste the code above and save it into a .ps1 file of your choice.  Load this into your own PowerShell ISE.  When you execute it, it will save the AzureVMRoleSizes.csv into the location where you’re executing the script.  Locate the .csv and double-click to open in Excel.  Now you can sort, filter and group off the Data menu.


image


To enhance this you can add parameters for $AzureLocation and $CSVFileName and then turn it into a Function you can call anytime you need the current Azure IaaS VM Role Size (-InstanceSize) list of any given Azure Region (Location).

NOTE:  For additional information see the Hey, Scripting Guy! Blog series on Manage Azure IaaS with Windows PowerShell.

Posted in Azure IaaS, PowerShell

Export multiple Windows Server 2012 R2 Hyper-V Guests with PowerShell Part II

Expanding upon the basics demonstrated in Part I of this series, let’s now look at exporting multiple machines using a single PowerShell script.  We’ll use the same director structure as outlined in Part I, but here we have a few additional challenges to overcome.

  • Selecting the Virtual Machines to export.
  • Ensuring that we only export one at a time to reduce the disk I/O and resulting disk fragmentation that will occur if simply try to export all of the machines at one time.
  • You want to export the machines while they’re in a running state.

The following PowerShell script will do the job admirably, but let’s take a look at a few key sections that make this possible.

First the assumptions:

  • HyperV Host is running Windows Server 2012 R2 as this will not work on Windows Server 2012.

Then the script:

#

# $RootPath: Can be changed to point where you’d like the Virtual Machines exported and can be any valid

#            drive path.

$RootPath = ‘E:\Exports-RONBOKEVGA1\Backup\’

# $OutputDate: Is simply used to create a unique folder name that later can have it’s CreationDate checked

#              for deletion later.

$OutputDate = (Get-Date).Year.ToString() + ‘.’ + (Get-Date).Month.ToString() + ‘.’ + (Get-Date).Day.ToString() + ‘.’ + (Get-Date).Hour.ToString() + ‘.’ + (Get-Date).Minute.ToString() + ‘.’ + (Get-Date).Second.ToString()


#Clean up old Export-VM folders older than one month ago to reduce disk space consumption.

foreach ($i in Get-ChildItem $RootPath)

{

    if ($i.CreationTime -lt ($(Get-Date).AddMonths(-1)))

        {

            #Write-Output $i.Name.ToString()

            Remove-Item $i.PSPath -Recurse

        }

}


#Create new Export folder with current date/time.

$ExportPath = New-Item ($RootPath + ‘ ‘ + $OutputDate) -type directory


# Set the $Status variable to a default value which should indicate that no VM’s are being exported.

$Status = Get-VM | Where Status -EQ ‘Exporting virtual machine’


Function CheckStatus()

{

    Do

    {

        # We only want to be exporting one VM at a time so that we don’t overtax disk I/O.

        # The function ensures that by checking the VM status before starting the next export.

        Start-Sleep -s 60

        $Status = Get-VM | Where Status -EQ ‘Exporting virtual machine’


        $d = Get-Date -DisplayHint Time


        Write-Host “Exporting…” $d -ForegroundColor Yellow


    } While ($Status.Count -ne 0)

  }


Function ExportVM($VM)

{

    Export-VM -ComputerName $env:COMPUTERNAME -Name $VM.VMName -Path $ExportPath -AsJob

    Write-Host ‘Starting Export: ‘ $VM.VMName -ForegroundColor Yellow

}


# This is our list of VM’s to export based on a naming filter.

# It’s important to be consistent when naming VM’s in the Hyper-V Console!

$VMList =  Get-VM | Where-Object {$_.Name -like ‘RonBok*’}

Write-Host $VMList.VMName

Clear-Host


ForEach ($VM in $VMList)

{

    # The DPM VM’s are using physical disks, so they cannot be exported.

    # They’d be so large that it would be impossible anyway.

    If (($VM.VMName -ne ‘RonBokDPM1’) -and ($VM.VMName -ne ‘RonBokDPM2’))

    {

        ExportVM $VM

        CheckStatus

    }

}

The key to this whole thing are the two functions ExportVM() and CheckStatus().  CheckStatus() queries the list of VM’s in HyperV and looks for any VM that has a status of ‘Exporting virtual machine’.  It’s rather fragile in that respect, but it works.

The other thing to note is the ForEach loop at the bottom … really the main part of the script.  It creates an object $VMList of all the VM’s in my environment that begin with ‘RonBok*’ as those are the ones I want exported.  For your environment you’ll need to decide what kind of query works best for you and change the script accordingly.  Also note that I have a few System Center Data Protection Manager 2012 R2 machines in this list an want them excluded.  Those VM’s I can’t export anyway because they are using physical disks for storage.  I’ll cover System Center Data Protection Manager 2012 R2 in Part III.

If you have any questions feel free to post in the comments.

Have fun!

Tagged with:
Posted in Hyper-V, PowerShell, Windows Server 2012 R2

Export multiple Windows Server 2012 R2 Hyper-V Guests with PowerShell Part I

After spending many hours building out multiple Hyper-V guests there’s always a chance that something will go wrong and you’ll be needing a backup to restore from.  There are many options available, but suffice it to say that while useful, Checkpoints & Replication are not backups.

So what are the other options?  The simplest is an Hyper-V Export to another location.  The more robust solution is using System Center 2012 R2 Data Protection Manager, [which I’ll begin to cover in Part III].

Now, while we can manually Export… any guest from Hyper-V Manager wouldn’t it be nice to be able to query the list of machines and then Export… them one by one to a location on an automated basis using Task Scheduler?

Before we get into the PowerShell to accomplish this task, I’d like to point out that Microsoft still has not provided an –Overwrite switch on the Export-VM command.  Thus if you want to repeat this process and keep multiple weeks or a months backups you’ll have to find another option for if the files/folders exist the Export-VM command will fail to execute.  So what’s a possible solution?  Create a folder with a current data/time stamp to hold all of the exported machines and then do this each time the PowerShell command executes.  Simple right?  Well, keep in mind that after awhile these folders will pile up and you’ll also need a method of deleting old ones as well depending upon how long you want to store them. 

image

In the example above a separate drive D: has been designated as the Export location and a folder called Exports has been created to store each export based upon the data/time the Task Scheduler task executes the PowerShell script.

The first step in the PowerShell script is to query the list of existing folders and then removes the folder older than one month from the current date/time.  This keeps 5 backups and helps reduce the disk space required for the backups.  [NOTE:  System Center 2012 R2 Data Protection Manager can significantly reduce backup disk space consumption, but we’ll cover that in Part III.]

So let’s look at a simple script to accomplish the above, with a single machine, then we’ll get fancy (in Part II) skirting some other issues that result from exporting multiple machines at one time and the disk I/O, we’ll also address the SLA issue of 99.9% availability for the machines you want to backup, etc.

First the assumptions:

  • We have only one guest machine we want to export/backup.
  • It is OK to stop the guest machine while we back it up and then we’ll restart it after the export is complete.
  • It only takes 3 minutes to shutdown the guest machine properly.

The simple PowerShell script below will accomplish this task given the assumptions above.

#

# $RootPath: Can be changed to point where you’d like the Virtual Machines exported and can be any valid

#            drive path.

$RootPath = ‘D:\Exports\’

# $OutputDate: Is simply used to create a unique folder name that later can have it’s CreationDate checked

#              for deletion later.

$OutputDate = (Get-Date).Year.ToString() + ‘.’ + (Get-Date).Month.ToString() + ‘.’ + (Get-Date).Day.ToString() + ‘.’ + (Get-Date).Hour.ToString() + ‘.’ + (Get-Date).Minute.ToString() + ‘.’ + (Get-Date).Second.ToString()


$GuestVMName = “GuestVirtualMachineName”


Try

{

    Stop-VM -Name $GuestVMName

    Start-Sleep -Seconds 180

}

Catch

{

    Break

}


#Clean up old Export-VM folders older than one month ago to reduce disk space consumption.

foreach ($i in Get-ChildItem $RootPath)

{

    if ($i.CreationTime -lt ($(Get-Date).AddMonths(-1)))

        {

            #Write-Output $i.Name.ToString()

            Remove-Item $i.PSPath -Recurse

        }

}


#Create new Export folder with current date/time.

$ExportPath = New-Item ($RootPath + ‘ ‘ + $OutputDate) -type directory


#Export the VM.

Export-VM -ComputerName $env:COMPUTERNAME -Name $GuestVMName -Path $ExportPath


#Start the VM.

Try

{

    Start-Sleep -Seconds 180

    Start-VM -Name $GuestVMName

}

Catch

{

    Break

}


Adding this PowerShell to Task Scheduler and setting up a schedule provides an easy way to backup this single guest machine on a regular basis.

In Part II of this series, we’ll get into a more real world example of how to accomplish this for multiple guests and ensure that we’re exporting only one machine at a time to ensure quality disk I/O on the destination disk.  In Part III, we’ll get into System Center 2012 R2 Data Protection Manager.

Tagged with:
Posted in Hyper-V, PowerShell, Windows Server 2012 R2

Create A Windows Server 2012 R2 Hyper-V Machine with PowerShell

Creating a new guest hyper-v image using the Hyper-V Manager can become tedious after awhile especially when the need arises for creating an entire lab environment consisting of multiple guests all in one shot.

Using PowerShell to accomplish a task like this is the answer.  What follows is a very simple example that can be used to create more elaborate solutions toward that goal.  The intent is to demonstrate some of the basics while leaving the more elaborate solution (parameters, multiple guests, etc.) as an exercise for the reader.

NOTE:  Since the title of this article is Windows Server 2012 R2, this is not intended to function on Windows Server 2012.

This example creates a dual (2) CPU, 2GB RAM, guest with drive C: and a second drive (in this case a DC for storage of SYSVOL and NTDS), sets up the DVD drive with an .iso for installation of the OS, uses the default Network Adapter and creates a second for private use.


# Create the Virtual Machine

New-VM -Name RonBokDC01 -MemoryStartupBytes 2048MB -Path D:\HyperV\RonBokDC01 -Generation 2


# Create the Virtual Machines Required Disks

New-VHD -Path ‘D:\HyperV\RonBokDC01\Virtual Hard Disks\RonBokDC01.vhdx’ -SizeBytes 127GB -Dynamic

New-VHD -Path ‘D:\HyperV\RonBokDC01\Virtual Hard Disks\Data.vhdx’ -SizeBytes 127GB -Dynamic


# Attach the Virtual Machines Disks to the SCSI Controller

Add-VMHardDiskDrive -VMName RonBokDC01 -Path ‘D:\HyperV\RonBokDC01\Virtual Hard Disks\RonBokDC01.vhdx’ -ControllerType SCSI -ControllerNumber 0 -ControllerLocation 0

Add-VMHardDiskDrive -VMName RonBokDC01 -Path ‘D:\HyperV\RonBokDC01\Virtual Hard Disks\Data.vhdx’ -ControllerType SCSI -ControllerNumber 0 -ControllerLocation 1


# Attach the Windows Server 2012 R2 .iso to the DVD for installation.

Set-VMDvdDrive -VMName RonBokDC01 -ControllerNumber 1 -Path ‘E:\Downloads\MSDN\Operating Systems\en_windows_server_2012_r2_x64_dvd_2707946.iso’


#Get the first Network Adapter, usally named ‘Network Adapter’ and attach it to the Public NIC of the VM Host.

$NetAdapter = Get-VMNetworkAdapter -VMName RonBokDC01

$NetAdapterName = $NetAdapter.Name

Connect-VMNetworkAdapter -VMName RonBokDC01 -Name $NetAdapterName -SwitchName ‘Intel(R) 82574L Gigabit Network Connection – Virtual Switch’


#Rename the first Network Adapter to Public.

Rename-VMNetworkAdapter -VMName RonBokDC01 -Name $NetAdapterName -NewName ‘Public’


#Add another Network Adapter called Private and attach it to the Private Network Switch.

Add-VMNetworkAdapter -VMName RonBokDC01 -Name ‘Private’ -IsLegacy $false -SwitchName ‘Private’


#Set Processors

Set-VMProcessor -VMName RonBokDC01 -Count 2


Tagged with: , ,
Posted in Hyper-V, PowerShell, Windows Server 2012 R2

Microsoft AD FS SAML Assertion Trouble Shooting w/Fiddler

When working with multiple Relying-Party’s / Service Providers in AD FS it often becomes necessary to ensure that the Saml Assertions / Claims being sent are indeed being sent.  By using the IdpInitiatedSingon.aspx page included with AD FS 2.1 on Windows Server 2012 and Fiddler together the Saml Assertions / Claims can be inspected and confirmed.


Requirements & Assumptions

Teleriks Fiddler Tool w/SSL Capture Enabled

A functional Microsoft AD FS 2.1 Farm on Windows Server 2012 with or without an AD FS Proxy.

The known endpoint of your AD FS Farm:  https://sts.domain.com/

At least one Relying Party Trust with a Service Provider configured to send a few claims.

When creating the Relying Party Trust, you chose NOT to encrypt the claims.

Add-ADFSRelyingPartyTrust  … -EncryptClaims $False

Credentials in the domain in which the AD FS Farm resides.

SAML 2.0 Web SSO Protocol is being used, not WS-Federation Passive Protocol.


Step 1 – Get Authenticated by AD FS in your domain


Browse to https://sts.domain.com/adfs/ls/IdpInitiatedSignOn.aspx.

SNAGHTML1cf7533


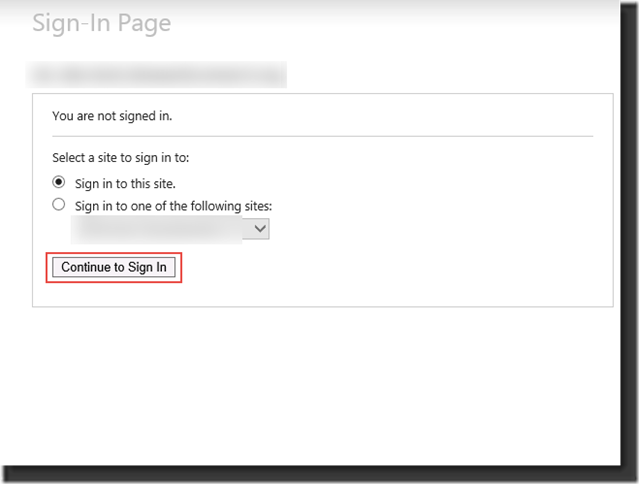
Click, Continue to Sign In.

SNAGHTML1d512f2

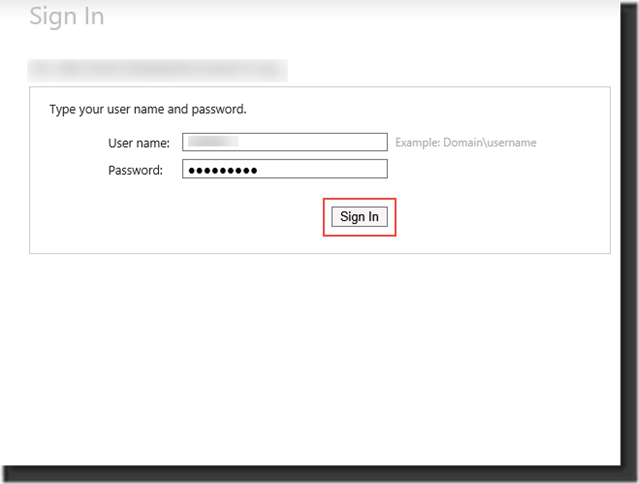
Type your domain credentials as shown.  This user should have Windows Credentials in the domain to which the ADFS Farm is joined.  Click, Sign In.


Step 2 – Select a Relying Party Trust / Service Provider to Test


SNAGHTML1d8d691


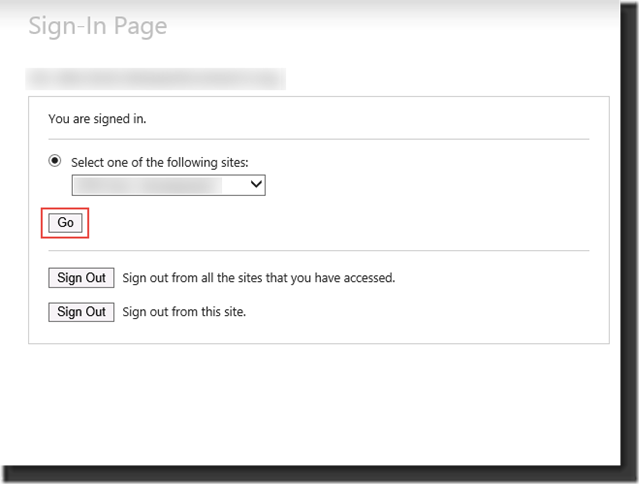
To test our POST to our Relying Party, select it from the Select one of the following sites: drop down.


Step 3 – Get ready to capture the Fiddler session

Start, Fiddler to being your trace.

Once Fiddler is running and ready to capture your trace, click the Go button.


Step 4 – Review the Fiddler Session Capture to locate your SAML Token.


In Fiddler, look for the GET request that looks like, https://sts.domain.com/adfs/ls?SAMLRequest= …. and select that item in the Fiddler session panel.

Select Inspectors in Fiddler, and select TextView.

Look for a section contained in this POST that looks like:

<input type=”hidden” name=”SAMLResponse” value=” …. lots of base 64 encoded values … “/><noscript><p>Script is disabled. Click Submit to continue.</p><input type=”submit” value=”Submit” /></noscript></form><script language=”javascript”>window.setTimeout(‘document.forms[0].submit()’, 0);</script></body></html>


SNAGHTML1eed687

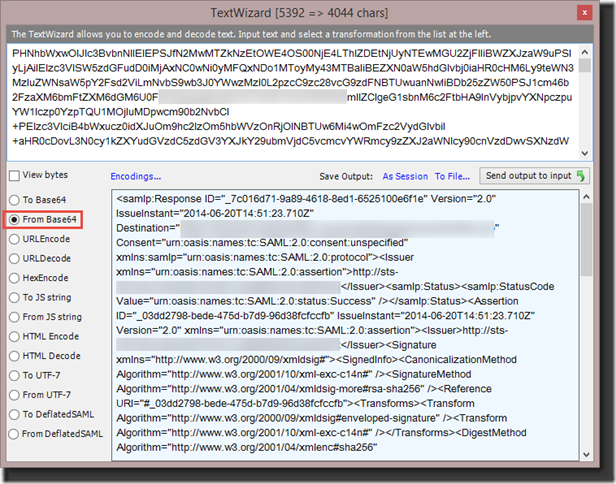
It is the base 64 encoded string between the two quotes …. lots of base 64 encoded values … , that we want to carefully select in Fiddler with our cursor.

After selecting the text detailed above, right-click on the text and send it to the Fiddler TextWizard. Once loaded into the TextWizard, select the radio button From Base64 to decode the POST into readable format.  This is your SAML Token.

SNAGHTML1f226ac

It will include your AD FS Token-Signing Certificate and toward the very bottom of the XML, will include a section where your assertions / claims will be visible:

<AttributeStatement>
  <Attribute Name=”http://schemas.xmlsoap.org/ws/2005/05/identity/claims/emailaddress”>
    <AttributeValue>username@domain.com</AttributeValue>
  </Attribute>
  <Attribute Name=”http://schemas.xmlsoap.org/ws/2005/05/identity/claims/dateofbirth”>
    <AttributeValue>1980-01-01</AttributeValue>
  </Attribute>
</AttributeStatement>

If you do not see any claims, then your Claims Rules are not being processed for this user account.  To trouble shoot your Claims Rules, a good starting point is add a static Issue Rule like the one described on TechNet.

=> issue(type = “http://test/role&#8221;, value = “employee”);

If you do not see any claims,Then, simply retest using the steps above until you are certain that the SAML Assertions / Claims you want passed are indeed being passed.

Tagged with: ,
Posted in AD FS, Windows Server 2012