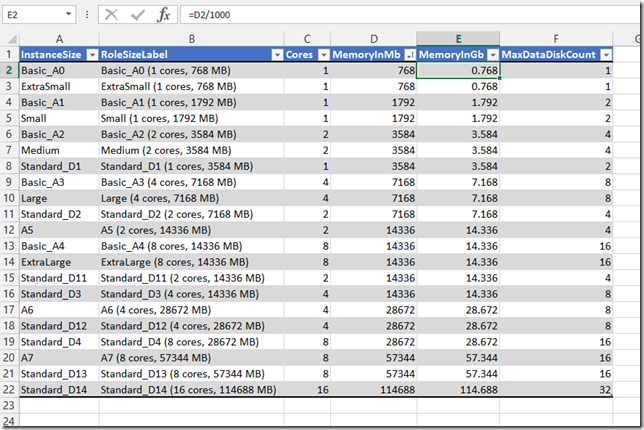
Quite often when creating new Virtual Machines in Azure IaaS we find ourselves looking up the available Azure VM Role Sizes on a Region by Region basis. What I’d like to have handy is a quick Excel spreadsheet that I could sort, filter or group by various Role Size attributes and then plug in the proper -InstanceSize value for the New-AzureVMConfig command.
New-AzureVMConfig -Name $VMName -InstanceSize “Medium” -ImageName $AzureVMImage
In the example above, the choice for Role Size or -InstanceSize is “Medium”, but quick, answer the question about the other choices above that? I think you get the point.
So enough already, here’s the code sample, but of course you could turn this into a full function as well, but this should get you started. Notice too that we’re forcing the execution of this in the PowerShell ISE.
# Check if we’re running in the PowerShell ISE or PowerShell Console.
If ($Host.Name -like “*ISE*”)
{
$AzureLocation = “Central US”
$AzureVMRoleSize = (Get-AzureLocation | Where { $_.DisplayName –eq $AzureLocation}).VirtualMachineRoleSizes
$CSVFileName = (Split-Path -Parent $psISE.CurrentFile.FullPath) + “\” + “AzureVMRoleSizes.csv”
# If an old version of the CSV file exists, we’ll delete it.
If(Test-Path $CSVFileName)
{
Remove-Item $CSVFileName -Verbose
}
# Console output
Write-Verbose -Message “…” -Verbose
Write-Verbose -Message “[Start] Creating the CSV file: $CSVFileName.” -Verbose
Foreach ($VMSize in $AzureVMRoleSize)
{
# Create the CSV file.
Get-AzureRoleSize $VMSize | Select InstanceSize,RoleSizeLabel,Cores,MemoryInMB,MaxDataDiskCount | Export-Csv $CSVFileName -NoTypeInformation -Append -Verbose
}
# Console output
Write-Verbose -Message “…” -Verbose
Write-Verbose -Message “[Finish] Created CSV file: $CSVFileName. To view, double-click to open in Excel.” -Verbose
}
Else
{
# Console output
Write-Verbose -Message “[Stop] Unable to continue. PowerShell ISE, not the PowerShell Console, must be used for execution.” -Verbose
Stop
}
Copy/Paste the code above and save it into a .ps1 file of your choice. Load this into your own PowerShell ISE. When you execute it, it will save the AzureVMRoleSizes.csv into the location where you’re executing the script. Locate the .csv and double-click to open in Excel. Now you can sort, filter and group off the Data menu.
To enhance this you can add parameters for $AzureLocation and $CSVFileName and then turn it into a Function you can call anytime you need the current Azure IaaS VM Role Size (-InstanceSize) list of any given Azure Region (Location).
NOTE: For additional information see the Hey, Scripting Guy! Blog series on Manage Azure IaaS with Windows PowerShell.

Leave a comment